
Budget Plotting build
Rev 1.1 (updated for Chia 1.0.4+)
Ask @storage_jm on keybase for any questions regarding this build
The idea of this plotting build centers around 8 core desktop CPUs being the plotting sweet spot for a low-end budget, in terms of price, performance, IO connectivity, and DRAM requirements. The build aims at getting 8 plotting processes concurrently for a target of 2.5-3TB total amount plotted per day for a total cost of under $1000.
Updates!! 4/29/2021
1.0.4 brought massive improvements to the temp space and DRAM requirements for Chia plotting. Just playing around I managed to get this system up to 29 k=32 per day, or 3.1TB per day. The largest change in the budget build is now this can be built for $700-800 because only 2TB of SSD is required.
Here is the output of plotman running 12 processes in parallel. Notice the total time goes way up, and the TiB per day on the system only increases marginally vs 8 process. This is because this is an 8 core CPU and hyperthreading is not perfectly efficient.
(venv) jm@h470:~/chialogs$ ls 2021-04-25* | wc -l
29
(venv) jm@h470:~/chialogs$ plotman analyze 2021-04-25*
+-------+----+-------------+---------------+--------------+--------------+--------------+--------------+
| Slice | n  |   %usort    |    phase 1    |   phase 2    |   phase 3    |   phase 4    |  total time  |
+=======+====+=============+===============+==============+==============+==============+==============+
| x     | 29 | μ=100.0 σ=0 | μ=12.6K σ=486 | μ=7.4K σ=263 | μ=13.8K σ=2K | μ=1.2K σ=392 | μ=35.0K σ=2K |
+-------+----+-------------+---------------+--------------+--------------+--------------+--------------+
Budget for sub $1000 build
Component | Model | Price | Comment |
CPU | $250 | Minimum for this build | |
DRAM | $120 | Higher speed nice to have but not required. NO RGB FFS!! | |
Motherboard | $100 | Z490 is ok used if under $100, but non-overclocking boards are the target | |
PSU | $50-70 | This will be running 24/7 so attempt to find a gold for good power efficiency | |
CPU cooler | $40-50 | Find used like new for best deal! I love be quiet or noctua, but whatever is on sale. | |
Case | $50 | Soooo many options, I like NZXT H510 | |
Boot SSD | $30 | Cheapest boot option, whatever you have available works | |
Temp SSD Option 1 | 3x 960GB SATA or 6x 480GB SATA | $300 | Budget build with SATA if you can find cheapest |
Temp SSD Option 2 | 2x 1.92/2TB M.2 NVMe | $300 | SSD recommendations here |
Temp SSD Option 3 | 1x 2TB or 3.2TB NVMe | $300 +25 cable | Best option, but must find good deal on used drive. |
Total | Sub $1000 |
Tips for shopping for the budget build to get the lowest possible price
- Check slickdeals.net for any of the components to see what deals are active and what the previous deal prices were for the components
- Check Amazon warehouse for “Used like new” for motherboards and CPU coolers as the priority. These components get a lot of returns because of incompatibility with CPUs or people not knowing how to mount them, so often you can save 20-30% and have a brand new board.
- Check the spreadsheet on the SSD endurance wiki for the best models, and buy whatever you can get the best deal on locally. I prefer to find used data center SSDs on eBay. They have a good return policy as well.
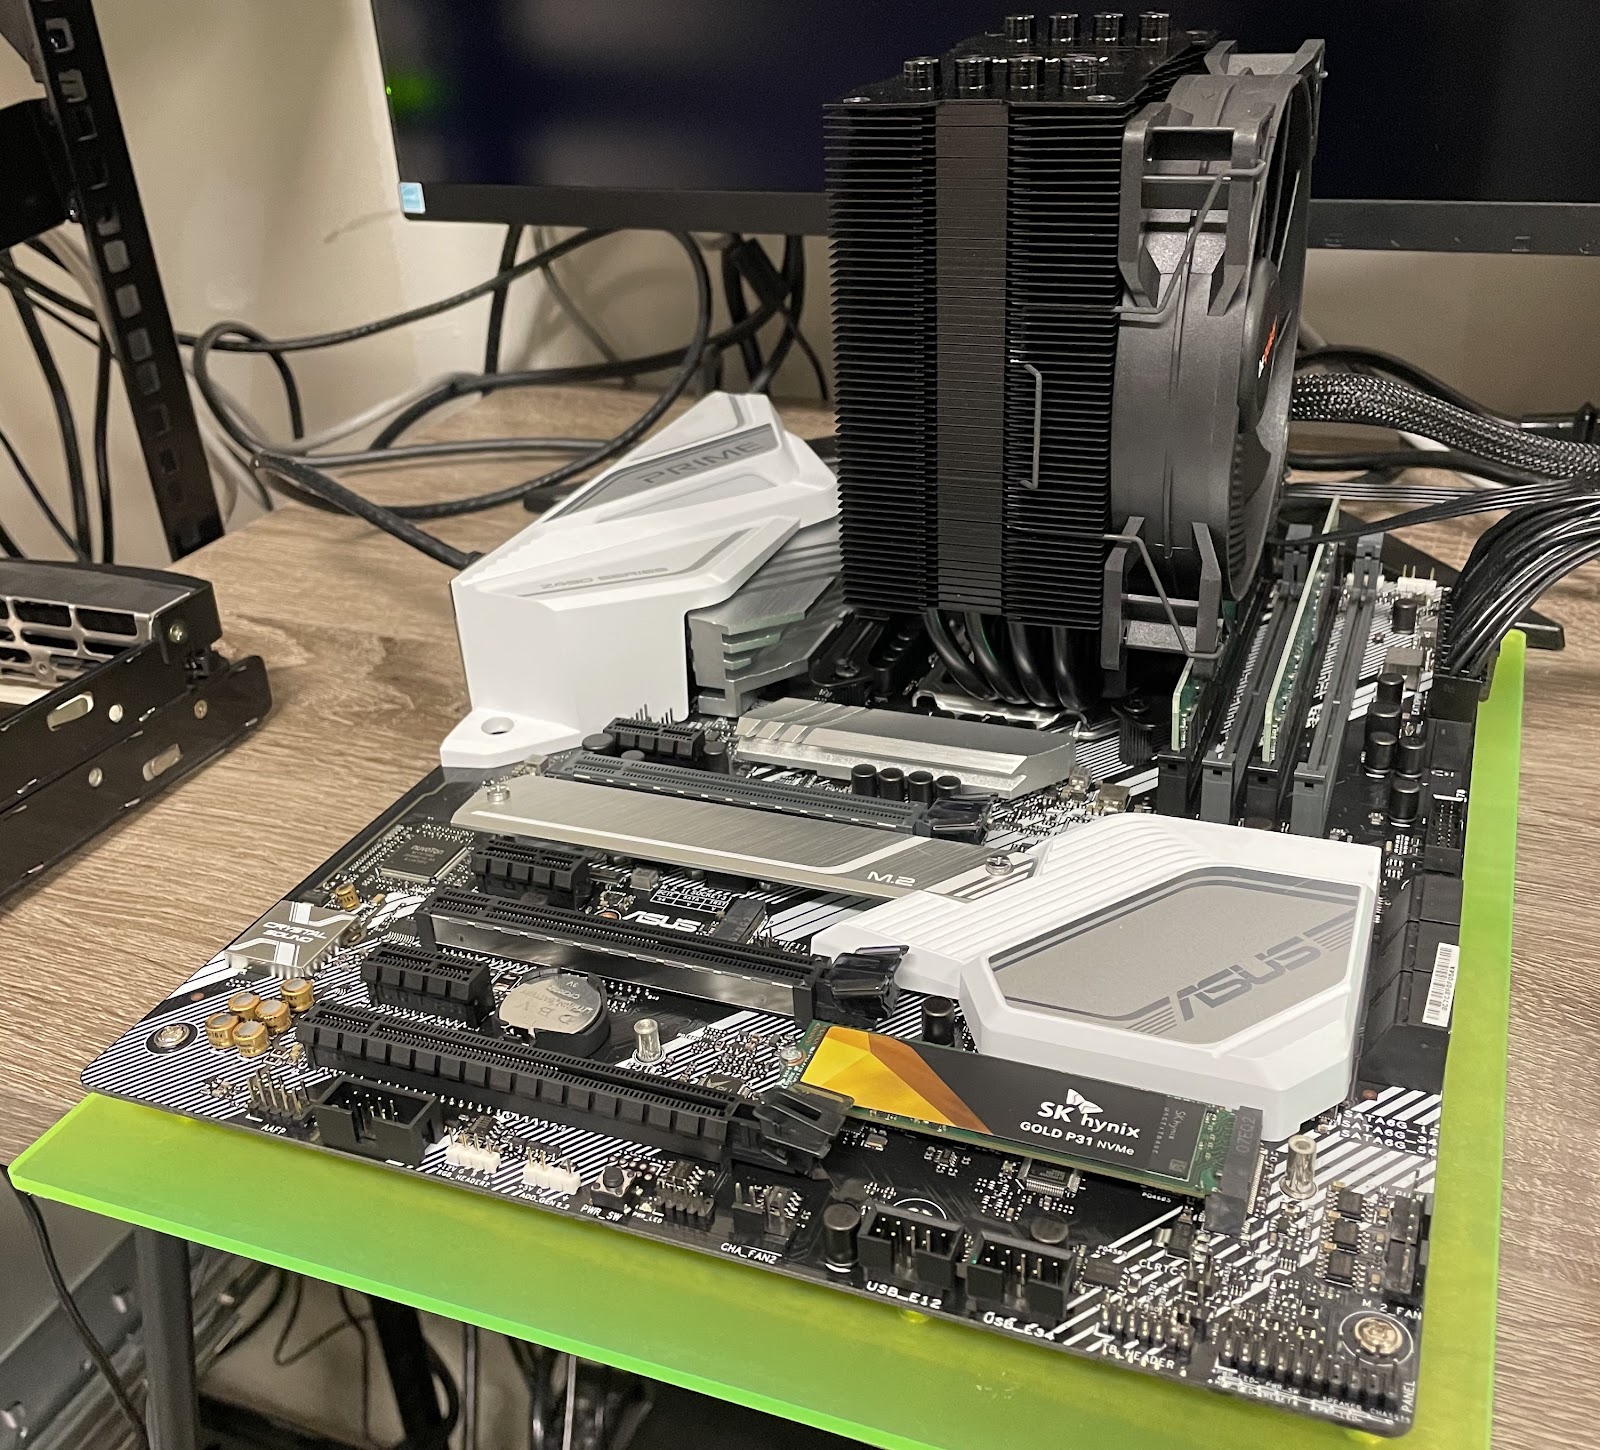
CPU Selection
This build circles around the critical component, the i7-10700 CPU. This is the leader in price to performance, it has 8 cores and 16 threads, and has high turbo boost speeds. It does not support overclocking so setting it up is very simple and requires a lower end motherboard (B460 or H470)

Source: https://www.techpowerup.com/review/intel-core-i7-10700/20.html
On sale this CPU goes for $250. As of writing this the average price is around $275
Upgrades – if you can’t find the 10700, you can get the Intel i7 10700K or the Intel Core i7-10850 (but this is overkill for the value build). We will write another guide with AMD version, but the AMD 3800x and AMD 5800x would be great if they can be found for $250-300 range.
Buy on Amazon Here: Intel Core i7 10700
DRAM
Since this build revolves around doing 8 k=32 in parallel, 32GB of DDR4 is the target in 2x16GB DIMMs. My advice is to find the cheapest DRAM you can possibly find. There is likely some benefit to faster DDR4 speeds, around 3200 to 3600MHz, but it hasn’t been widely demonstrated in the reference plotting hardware as of today. 32GB with 4000MB per plotting process is right up against the edge for memory utilization, but since the plots will be staggered by 1hr each this runs with no errors.
CPU Cooler
Just need something here to ensure that clock speeds and turbo are running as high as they possibly can. I’m a big fan of be quiet Dark Rock 4, which I have found many times on Amazon warehouse for under $40. Buy whatever is cheap and has a minimum of 150W TDP of cooling capability for max headroom. There are hundreds of options, but you don’t need anything overkill because this CPU does not support overclocking.
Power Supply Unit (PSU)
500W minimum PSU is required for this build for good measure. Although the actual power consumption of this build will be in the 200-250W range, 350W budget power supplies are not made very well and lack the proper number of connectors. Gold efficiency is preferred due to 24/7 operation of the plotter to get maximum efficiency and lowest power consumption. 650W or 750W is ok too if you have them available, but way overkill for this build. I have only used Corsair and EVGA PSUs, so that is my personal preference, but read reviews to find whatever is good for around $50.
Motherboard
The Intel Core i7 10700 does not support overclocking, so only a B460 or ASUS Prime H470 is required. Motherboard model does not matter much in this case. My preference is to go to Amazon warehouse and find whatever the cheapest model is. Z490 also works if the board can be found for under $100. Intel chipsets for 10700. B460 and ASUS Prime H470 are very similar, the only delta being IO (4 more PCIe lanes and more USB). Either should work just fine. My current build is actually using a ASUS Prime H470 that I got off Amazon warehouse for $88.17.
SSD for temporary storage
This build will be targeting 8 plots in parallel, and requires ~332GiB per process for a total temporary space requirement of 2665GiB or 2.85TB.
- 3x 960GB SATA
- Preference ofIntel S4510, Intel S4610, or Samsung or Micron datacenter – target sub $100 each on eBay used
- Amazon prime only – SK SK Hynix Gold 1 TB x 3 ($80 each). With 600TBW each, this should be adequate for 75-450TB of total plots combined
- 6x 480GB would also work, but would consume more SATA lanes than the chipset and would require an HBA like 9200-8i ($20)
- 2x 2TB M.2 NVMe
- Preference for 1.92TB Samsung PM983. Make sure your motherboard supports 2x 110mm M.2 slots! Multiple M.2 can be put on a PCIe add-in-card as well, like this one from ASUS M-2 X16.
- Find any consumer NVMe that has >1000TBW per drive. Make sure you use the SSD endurance sheet to model how much you are going to be plotting. For small scale farms (100-200TB) this should be plenty of endurance.
- 1x 2TB or 3.2TB NVMe – this is the preferred option, but slightly more expensive than the first two, and requires some used hardware hunting skills.
- Preference is the Intel SSD D7 P5510 (brand new, harder to find but will get easier in 2021), Intel SSD DC P4610, Samsung PM1725 or any other mixed workload (3 DWPD endurance) class NVMe. This is going to be in the U.2 form factor and requires this adapter to hook up to a desktop motherboard. (this PCIe add-in-card to U.2 adapter works as well)
- THIS IS THE HARDEST PART OF THE BUILD. You will have to do some ninja shopping on eBay, but this is very doable. Anything that is 3.2TB or above that is on the endurance spreadsheet with high TBW will work
Thermals for temp drives. NVMe SSDs get hot with sustained write workloads. Monitor temps through smartmontools (sudo smartctl -a /dev/nvme0n1) or NVMe-CLI (sudo nvme smart-log /dev/nvme0n1). If your NVMe drive is getting above 70C and triggering the NVMe SMART critical temp warning, you need to add an additional fan to your desktop or directly on top of the U.2 NVMe.
Destination drive
Find a case that supports at least 2x 3.5in HDDs. This build revolves around swapping the drives when they get full and rotating them in. You could just as easily use a NAS or rsync them directly over the network to your farm. With 2x 16TB HDDs you have to swap the drives once every 12 days or so, which can be done in under 5 minutes. This is covered in detail in the Farming Guide
Time to Plot
There is almost no need for any major tuning, the out of the box performance should be around 2.5-3TB per day, depending on the temporary storage that was chosen.
- Complete desktop build above. This is a very easy build and even a novice can complete it with the many tutorials on YouTube for PC building.
- Install Ubuntu Server – no need for a monitor with this besides initial install. Ubuntu desktop is tempting…but you need to install a lot more packages and there are many more chances for bugs. Take the training wheels off and try cli only!
- After getting the iso file for Ubuntu Server – If you’re on a mac use Balena Etcher, if you’re on Windows use Rufus. If you’re on Linux then you don’t need this advice (but here it is anyways)
- After getting the iso file for Ubuntu Server – If you’re on a mac use Balena Etcher, if you’re on Windows use Rufus. If you’re on Linux then you don’t need this advice (but here it is anyways)
- ssh into from your laptop (open terminal on mac, or powershell in Windows)
ssh user@hostname (or ip address)- Make sure your HDD appears and format destination drive
This is the optimal setting for destination drive to maximize storage capacity efficiency with a very short format time
sudo fdisk -l
sudo mkfs.ext4 -m 0 -T largefile4 -L <drivename> /dev/sda
mkdir /mnt/hdd
mount /dev/sda /mnt/hdd- if using SATA build or 2x consumer NVMe, RAID 0 the drives together
sudo mdadm -C /dev/md0 /dev/sd[a,b,c] -n 3 -l 0 -c 64
sudo mdadm -C /dev/md0 /dev/nvme[1-2]n1 -n 2 -l 0 -c 64- format temp drive
mkfs.xfs /dev/nvme0n1
or
mkfs.xfs /dev/md0
mkdir /mnt/ssd
mount -t xfs -o discard /dev/md0 /mnt/ssdsudo apt-get update
sudo apt-get upgrade -y
# Checkout the source and install
git clone https://github.com/Chia-Network/chia-blockchain.git
cd chia-blockchain
sh install.sh
. ./activate- edit permissions (I know, I know, this isn’t best security practice but this should be on your home network NOT in a remote location. Different security is required if this is the case)
mkdir /home/user/chialogs
chmod 777 /mnt/hdd
chmod 777 /mnt/ssd
chmod 777 /home/user/chialogs
sudo nano chia8.sh- Paste the follow in, with edits to your user name, and temp and destination directory names
 #!/bin/bash
screen -d -m -S chia1 bash -c 'cd /home/user/chia-blockchain && . ./activate && sleep 0h && chia plots create -k 32 -b 4000 -e -r 4 -u 128 -n 16 -t /mnt/ssd/temp1 -2 /mnt/ssd -d /mnt/hdd |tee /home/user/chialogs/chia1_1_.log'
screen -d -m -S chia2 bash -c 'cd /home/user/chia-blockchain && . ./activate && sleep 1h && chia plots create -k 32 -b 4000 -e -r 4 -u 128 -n 16 -t /mnt/ssd/temp2 -2 /mnt/ssd -d /mnt/hdd |tee /home/user/chialogs/chia2_1_.log'
screen -d -m -S chia3 bash -c 'cd /home/user/chia-blockchain && . ./activate && sleep 2h && chia plots create -k 32 -b 4000 -e -r 4 -u 128 -n 16 -t /mnt/ssd/temp3 -2 /mnt/ssd -d /mnt/hdd |tee /home/user/chialogs/chia3_1_.log'
screen -d -m -S chia4 bash -c 'cd /home/user/chia-blockchain && . ./activate && sleep 3h && chia plots create -k 32 -b 4000 -e -r 4 -u 128 -n 16 -t /mnt/ssd/temp4 -2 /mnt/ssd -d /mnt/hdd |tee /home/user/chialogs/chia4_1_.log'
screen -d -m -S chia5 bash -c 'cd /home/user/chia-blockchain && . ./activate && sleep 4h && chia plots create -k 32 -b 4000 -e -r 4 -u 128 -n 16 -t /mnt/ssd/temp5 -2 /mnt/ssd -d /mnt/hdd |tee /home/user/chialogs/chia5_1_.log'
screen -d -m -S chia6 bash -c 'cd /home/user/chia-blockchain && . ./activate && sleep 5h && chia plots create -k 32 -b 4000 -e -r 4 -u 128 -n 16 -t /mnt/ssd/temp6 -2 /mnt/ssd -d /mnt/hdd |tee /home/user/chialogs/chia6_2_.log'
screen -d -m -S chia7 bash -c 'cd /home/user/chia-blockchain && . ./activate && sleep 6h && chia plots create -k 32 -b 4000 -e -r 4 -u 128 -n 16 -t /mnt/ssd/temp7 -2 /mnt/ssd -d /mnt/hdd |tee /home/user/chialogs/chia7_2_.log'
screen -d -m -S chia8 bash -c 'cd /home/user/chia-blockchain && . ./activate && sleep 7h && chia plots create -k 32 -b 4000 -e -r 4 -u 128 -n 16 -t /mnt/ssd/temp8 -2 /mnt/ssd -d /mnt/hdd |tee /home/user/chialogs/chia8_2_.log'
save by hitting Ctrl + O and exit with Ctrl + X
Set n value to total number of k=32 plots per your capacity drive on the optimal size spreadsheet here divided by 8. You can also use the tool from user @kiwihaitch called https://plot-plan.chia.foxypool.io/ that finds the optimal configuration for maximum capacity utilization. This build revolves around 8 k=32, which is fine for the overwhelming majority of users. If you want to get over 99% capacity utilization on the destination drives, you need to use a mix of some k=33 and k=34 (completely optional!!)
Checks before you run the script!!!
Make sure your permissions are correct
ls -lh /mntYou should see output like this next to your mount directories for chia, drwxrwxrwx
Do you have a chia key? After you are activated, run chia keys -h to see available commands. You can either import a key from the 24 word seed or generate a new key. Alternatively if you have keys on another machine, you can use the public farmer and pool key to plot without having generated a key, more on that in the wiki, using -f and -p in the script with the respective keys
https://github.com/Chia-Network/chia-blockchain/wiki/CLI-Commands-Reference
Are all of your drives mounted!?
df -hI prefer duf, which is a much better alternative to df, easy to see your mounts. If you are on Ubuntu you can install by
sudo snap install duf-utilityor
wget https://github.com/muesli/duf/releases/download/v0.6.2/duf_0.6.2_linux_386.deb
sudo dpkg -i duf_0.6.2_linux_386.deb
Run script!
sh chia8.shAfter running make sure there are no permissions errors and that the script started correctly by monitoring the processes through htop or something similar. Everything runs in screens in the background, so you are perfectly fine to shut down the ssh from your laptop and let this thing run as long as it takes the fill up the destination drive. Fire up htop to make sure you can see the chia processes.
Monitoring tools to use
sudo apt install nvme-cli dstat sysstat glances smartmontools lm-sensorsif you’re on Ubuntu server you should already have htop, xfs, and mdadm. If you are on Ubuntu desktop you will need these too.
sudo apt install htop xfsprogs mdadmdstat, iostat, glances – use this to make sure drives are doing io. You can monitor things like IOPS, bandwidth, and iowait to ensure everything is running optimally
$ dstat
You did not select any stats, using -cdngy by default.
--total-cpu-usage-- -dsk/total- -net/total- ---paging-- ---system--
usr sys idl wai stl| read  writ| recv  send|  in   out | int   csw
 46   3  45   6   0| 456M  493M|   0     0 | 774k  873k|  14k   22k
 61   4  27   8   0| 879M  135M| 382B  904B| 112k  424k|  19k   11k
 66   2  30   2   0| 214M  382M| 186B  366B|  24k  340k|  10k 3228
 65   3  29   4   0| 483M  220M| 126B  366B|   0   804k|  13k 6226
 57   5  31   7   0| 735M  534M| 234B  358B|  48k  524k|  20k   13k
 52   4  40   5   0| 608M  314M|  66B  366B|  44k   80k|  15k 7278
 41   3  49   6   0| 720M  106M| 420B  408B| 104k 1068k|  15k 7554
 44   2  49   5   0| 564M  123M| 126B  408B| 720k   44k|  12k 6401
htop – use to monitor cpu and memory utilization
nvme or smartctl – use to monitor temps of SSDs (temperature and Warning Temperature Time) and endurance (percentage used)
$ sudo nvme smart-log /dev/nvme0n1
Smart Log for NVME device:nvme0n1 namespace-id:ffffffff
critical_warning                    : 0
temperature                         : 35 C
available_spare                     : 100%
available_spare_threshold           : 10%
percentage_used                     : 2%
data_units_read                     : 388030535
data_units_written                  : 439131137
host_read_commands                  : 4408452345
host_write_commands                 : 5349591480
controller_busy_time                : 3442
power_cycles                        : 46
power_on_hours                      : 2997
unsafe_shutdowns                    : 8
media_errors                        : 0
num_err_log_entries                 : 0
Warning Temperature Time            : 1
Critical Composite Temperature Time : 0
Thermal Management T1 Trans Count   : 0
Thermal Management T2 Trans Count   : 0
Thermal Management T1 Total Time    : 0
Thermal Management T2 Total Time    : 0
Checking CPU temperature
$ sensors
coretemp-isa-0000
Adapter: ISA adapter
Package id 0:  +51.0°C  (high = +80.0°C, crit = +100.0°C)
Core 0:        +44.0°C  (high = +80.0°C, crit = +100.0°C)
Core 1:        +47.0°C  (high = +80.0°C, crit = +100.0°C)
Core 2:        +47.0°C  (high = +80.0°C, crit = +100.0°C)
Core 3:        +48.0°C  (high = +80.0°C, crit = +100.0°C)
Core 4:        +51.0°C  (high = +80.0°C, crit = +100.0°C)
Core 5:        +46.0°C  (high = +80.0°C, crit = +100.0°C)
Core 6:        +48.0°C  (high = +80.0°C, crit = +100.0°C)
Core 7:        +48.0°C  (high = +80.0°C, crit = +100.0°C)

acpitz-acpi-0
Adapter: ACPI interface
temp1:        +27.8°C  (crit = +119.0°C)
And CPU frequency
watch -n 1 "cat /proc/cpuinfo | grep MHz"

cpu MHz		: 4235.305
cpu MHz		: 4200.053
cpu MHz		: 4232.139
cpu MHz		: 4205.699
cpu MHz		: 4241.188
cpu MHz		: 4229.982
cpu MHz		: 4283.402
cpu MHz		: 4231.991
cpu MHz		: 4251.913
cpu MHz		: 4190.267
cpu MHz		: 4279.481
cpu MHz		: 4235.723
cpu MHz		: 4205.051
cpu MHz		: 4242.980
cpu MHz		: 4198.080
cpu MHz		: 4216.730
Alternatively you can use
sudo apt install cpufrequtils
cpufreq-info -f
This has some more functionality but is completely optional…the built in tools work just fine
Checking output TiB / TB per day
@ericaltendorf on Keybase has made plotman, a tool for automating plotting. This can also be used in this build to automate the process (TBD add config.yaml instructions in here)
There is a useful tool called analyze, which parses the folder of logfiles for total plot times.
+-----+--------------+--------------+---------------+-------------+--------------+
| Key |   phase 1    |   phase 2    |    phase 3    |   phase 4   |  total time  |
+=====+==============+==============+===============+=============+==============+
| x   | μ=10.1K σ=1K | μ=5.9K σ=581 | μ=10.6K σ=475 | μ=1.2K σ=61 | μ=27.8K σ=2K |
+-----+--------------+--------------+---------------+-------------+--------------+
This is my average after a day of plotting on a new build with the exact script posted above. At 7.7 hrs per K=32 plot and running 8 in parallel, this machine is currently outputting 2.46TiB/day or 2.7TB per day. 2.5-3TB a day, depending on temp storage and other tweaks is achievable under $1000 total cost.
You can also check the output manually from the logs we are collecting
$ cat /home/jm/chialogs/chia* | grep "Total time"
Total time = 18689.540 seconds. CPU (123.430%) Mon Mar  8 06:08:05 2021
Total time = 27624.331 seconds. CPU (126.370%) Mon Mar  8 13:58:35 2021
Total time = 27743.498 seconds. CPU (126.000%) Mon Mar  8 21:51:03 2021
Total time = 27605.858 seconds. CPU (126.150%) Tue Mar  9 05:41:38 2021
Total time = 27689.233 seconds. CPU (126.380%) Tue Mar  9 13:34:00 2021
Total time = 21243.992 seconds. CPU (123.490%) Mon Mar  8 07:50:39 2021
Total time = 27220.745 seconds. CPU (126.750%) Mon Mar  8 15:34:14 2021
Total time = 27251.753 seconds. CPU (126.500%) Mon Mar  8 23:18:43 2021
Total time = 27373.984 seconds. CPU (126.940%) Tue Mar  9 07:05:37 2021
Total time = 27739.977 seconds. CPU (126.730%) Tue Mar  9 14:59:00 2021
Total time = 23799.221 seconds. CPU (124.650%) Mon Mar  8 09:33:15 2021
Total time = 27088.447 seconds. CPU (127.080%) Mon Mar  8 17:14:33 2021
Total time = 26933.108 seconds. CPU (127.320%) Tue Mar  9 00:53:46 2021
Total time = 27275.458 seconds. CPU (126.310%) Tue Mar  9 08:39:05 2021
Total time = 25178.969 seconds. CPU (126.760%) Mon Mar  8 10:56:15 2021
Total time = 27201.988 seconds. CPU (127.280%) Mon Mar  8 18:39:33 2021
Total time = 27285.382 seconds. CPU (127.110%) Tue Mar  9 02:24:36 2021
Total time = 27098.957 seconds. CPU (127.160%) Tue Mar  9 10:06:58 2021
Total time = 26477.352 seconds. CPU (126.060%) Mon Mar  8 12:17:53 2021
Total time = 27705.813 seconds. CPU (126.120%) Mon Mar  8 20:09:40 2021
Total time = 27422.683 seconds. CPU (126.490%) Tue Mar  9 03:56:30 2021
Total time = 27471.681 seconds. CPU (126.310%) Tue Mar  9 11:44:29 2021
Total time = 27536.192 seconds. CPU (126.140%) Mon Mar  8 13:35:32 2021
Total time = 27771.750 seconds. CPU (126.260%) Mon Mar  8 21:27:58 2021
Total time = 27976.810 seconds. CPU (125.700%) Tue Mar  9 05:24:13 2021
Total time = 27767.981 seconds. CPU (126.300%) Tue Mar  9 13:17:15 2021
Total time = 27885.292 seconds. CPU (126.780%) Mon Mar  8 14:41:21 2021
Total time = 27917.716 seconds. CPU (126.770%) Mon Mar  8 22:43:29 2021
Total time = 27771.121 seconds. CPU (126.760%) Tue Mar  9 06:44:06 2021
Total time = 28240.464 seconds. CPU (126.380%) Tue Mar  9 14:54:48 2021
Total time = 27710.351 seconds. CPU (126.990%) Mon Mar  8 14:38:26 2021
Total time = 27946.248 seconds. CPU (126.210%) Mon Mar  8 22:40:53 2021
Total time = 27876.926 seconds. CPU (126.880%) Tue Mar  9 06:43:04 2021
Total time = 28150.070 seconds. CPU (126.150%) Tue Mar  9 14:52:09 2021
This is it, super lame looking, I haven’t even taken the peel off the window. I put the SSD on the bottom here instead of mounting it on the back to keep it cool. I’ve added an extra $10 fan to the stock H510 case on the bottom slot to give the SSD extra airflow. Feel free to also just stick a small fan right on top of the drive (I’ve done that too). Only cables attached are power cable and cat6 ethernet, the desktop is managed completely remotely. I can ssh in from my phone to monitor status and even run the sh script to start plots if needed.
Update! 3TB a day achieved. The topless plotter (aka the budget budget build with no case)
Doing this build for a friend with a Z490, 10700, 32GB of DDR4, and a 4TB P4510 NVMe SSD.
Boot drive (overkill, but it was on sale when I bought for $50)
Temp drive – Intel P4510 4TB U.2 with adapter
grep -i "total time" /home/jm/chialogs/*.log |awk '{sum=sum+$4} {avg=sum/NR} {tday=86400/avg*8*101.366/1024} END {printf "%d K32 plots, avg %0.1f seconds, %0.2f TiB/day \n", NR, avg, tday}'

76 K32 plots, avg 24816.9 seconds, 2.76 TiB/day
I updated the BIOS to the latest from ASUS website, and set BIOS to C-states off. I have achieved sustained 4.6GHz on the 10700 with NO lower frequencies!! This appears to be 10% faster than the original budget build with a single NVMe. I suspect this is almost all from the CPU staying at 4.6GHz.
$ cat /proc/cpuinfo | grep MHz
cpu MHz		: 4599.798
cpu MHz		: 4599.996
cpu MHz		: 4600.000
cpu MHz		: 4604.241
cpu MHz		: 4599.958
cpu MHz		: 4600.007
cpu MHz		: 4600.005
cpu MHz		: 4600.003
cpu MHz		: 4599.910
cpu MHz		: 4599.996
cpu MHz		: 4600.242
cpu MHz		: 4600.000
cpu MHz		: 4600.000
cpu MHz		: 4600.018
cpu MHz		: 4600.767
cpu MHz		: 4599.996
Note on DRAM. This DRAM sucks, it does not support XMP but it was the cheapest DDR4 32GB I could find. I could not get this DRAM stable at 3200MHz on the ASUS Z490, but I set it to 2933 in BIOS and it is stable after a 5 days of continuous plotting. Next time I’ll just cave and buy the Corsair 3200 with XMP (I’ve used in all my gaming builds forever)


Nice write up! Can you explain a bit what you mean by “ This build revolves around swapping the drives when they get full and rotating them in”? To my understanding the plots need to be kept long-term, so swapping the drives doesn’t really make sense to me…
as opposed to have a NAS or remote share on a farm, this avoids the hassle of transferring data over the network. This case is not good for a farm because it only has two 3.5in slots
I see, so what you were saying was merely that ‘once the first disk become full, use the second disk to store the plots. Once they both become full, you can’t plot more but can only farm with what you got’. Is that correct?
I was reading through this as well and wondering about this. I’ve read through pretty much everything, but feel like I’ve missed something obvious :) Could you take us through it? After the HDDs are full then what? Transfer the data over to the network, while 2x other HDDs work and the switch the 2 first ones back in 12 days later? Or? Thanks.
Just to answer my own question, I found this video (that I’d overlooked) to answer my question, https://www.youtube.com/watch?v=oGTBMKVXRuA&t=1794s. the aha moment came :) Cheers.
Any one want to build me a Chia rig? I have no clue what I am doing… are there any resources for a prebuilt rig or a rig that doesn’t require building from scratch… I which I wasn’t such a novice…
Are there any classes I can take or videos that show/teach step by step.
Feels overwhelming
Here you go. This one is as simple as it gets, and you’ll get a mini desktop PC out of it for ~$1000.
https://chiadecentral.com/nuc-small-form-factor-plotting-build/